Digital Piano Recording & Editing Workflow

Introduction
Returning to piano after a 20-year hiatus, this time around I wanted to record videos of my performances as a way to mark the end of my active work on a musical piece, signifying that I have completed it to my satisfaction. I also wanted the video to serve as visual documentation of my approach to the piece (e.g., specific fingerings, musical interpretation, etc.) in case I ever decide to revisit the piece.
The best recording and editing setup for me is a simple and minimalist one; this blog post goes over my equipment, software, and workflow for recording my digital piano’s MIDI output, attaching the audio to a phone-recorded video, and publishing the final recording online.
Equipment & Software
Below is a list of equipment and software I use, plus my thoughts on them:
Roland FRP-2-ACR Digital Piano Bundle
This is a bundle available from Costco, and includes the piano, stand, bench, headphones, and pedal. It’s a great deal for just $699.99. The piano is actually an enhanced Roland FP-10 model, which is Roland’s entry level digital piano.
I like the feel of the keys, the sound via headphones is good/acceptable, the bench is comfortable (and has storage space), and assembling everything was easy. Overall, I’m fairly happy with this purchase as a casual piano player.
Things I don’t like are the pedal, which is basically useless since it slides around everywhere, and the muffled and low quality speakers when you’re not using headphones. For louder passages or energetic pieces, the piano will wobble because the stand isn’t sturdy enough, and the keys will make a loud clacky noise at which point I use headphones to help mute the noise.
I always practice and record with headphones on, but I occasionally play using the built-in speakers. I wish there was a button to switch between the two modes; right now I have to awkwardly bend over my piano to reach the back to pull out the headphones from the jack every time I want to switch to the built-in speakers.
Keyboard Dust Cover
Since the Costco piano bundle didn’t include a cover, I purchased a dust cover from Amazon. It’s a stretchy material, machine washable, and I like the snug fit over my keyboard. The cover is almost always on my piano and protects it not only from dust but also pet hair.
Roland DP-10 Real-Feel Pedal
Since the pedal that came with my Roland bundle slides around and doesn’t feel like a real piano pedal, I bought the Roland DP-10 pedal from Amazon. It comes with a non-slip rubber plate so it’s stable and doesn’t slip on my hardwood floors, and seamlessly integrated with my Roland piano.
USB C-to-B Cable
To record MIDI output from my piano, I purchased a USB C-to-B cable from Amazon. It’s possible that you may already have a similar cord, as it’s commonly used for printers and scanners.
I needed a 25-foot cable to go from my piano to my desktop computer along the perimeter of my office, and I liked how this cable has a nice braided material. I have this cable permanently connected between my computer and my piano for convenience.
Cable Raceway
Since the USB C-to-B cable is long enough to route along the perimeter of my office, I bought a white cable raceway from Amazon that sits on top of my baseboard trim to conceal the cable.
The cable raceway uses adhesive to stick to the wall, and has various connector shapes (T-fitting, flat elbows, etc.) for every connection.
Microphone Boom Stand
I purchased a tripod mic boom stand from Amazon to hold up my phone for recording video of my performances. This stand makes it easy to record from any angle, even overhead.
Digital Recorder Adapter & Phone Holder
To install my phone on the mic boom stand, I bought a digital recorder adapter from Amazon. I also use a cell phone holder adapter (which I already had from my existing photography equipment, something like this should work) to mount my phone.
iPad with forScore
On my iPad Air (5th generation), I use the forScore app to store my sheet music. I also have an Apple Pencil and it’s easy to write on my sheet music and make annotations within the app. I like digital sheet music more than physical sheet music because (a) no need to worry about storage, (b) your sheet music is always with you, (c) you can undo any annotations on your sheet music, and (d) no need to make sure your sheet music is staying flat and open.
Recently, I’ve upgraded to forScore Pro, which gives me the ability to make face gestures to automatically turn the page. I use the “mouth movement” mode, which works quite well after some practicing.
GarageBand
I use Apple’s native GarageBand app on my desktop computer to record the MIDI output from my digital piano. I also use it to attach the resulting MIDI sound to an existing video, then export as my final video file.
If you’re looking to make more complicated videos such as particle visualizations (e.g., Patrik Pietschmann’s YouTube channel), I’ve used SeeMusic in the past for recording MIDI, syncing to phone video, adding particle effects, and exporting the final video. I don’t use it anymore as I’m leaning towards less flashy videos with fewer distractions.
Photo of Setup
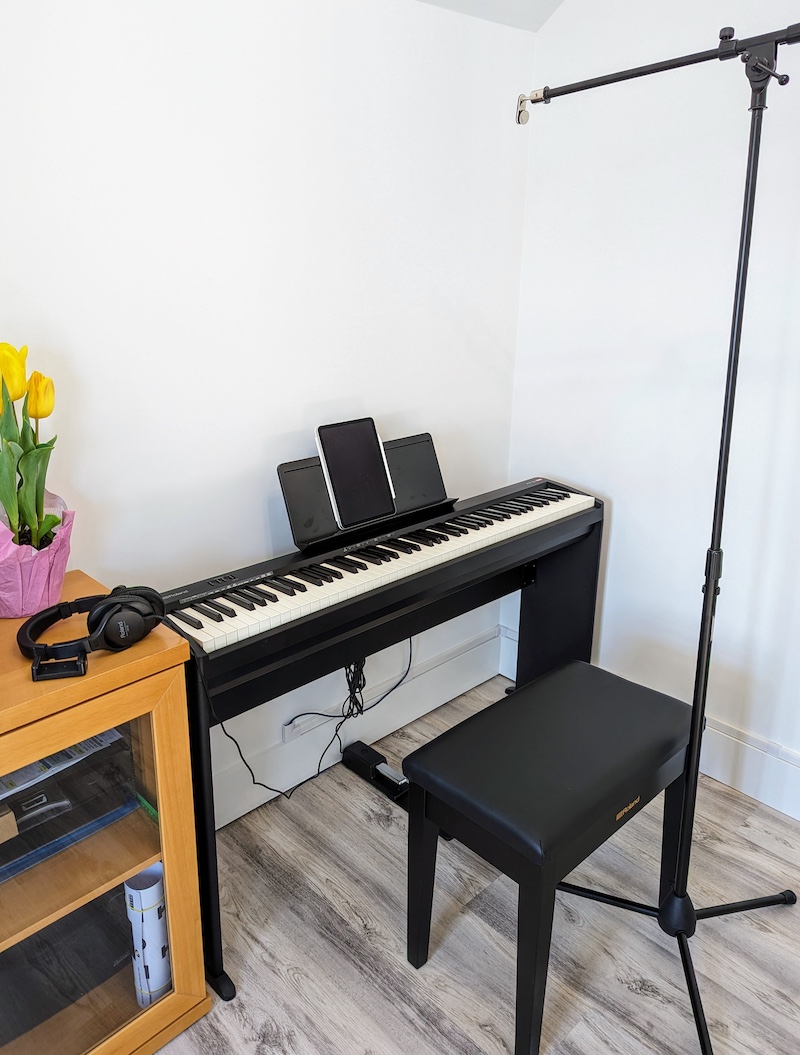
Here’s a photo of my piano recording setup, showing my Roland piano, DP-10 pedal, iPad for sheet music, cable raceway containing USB C-to-B running along baseboards, and mic boom stand with adapters positioned for overhead shooting:

Recording Workflow
Once the equipment is all set up, I simultaneously record my digital piano’s MIDI output using my computer and a phone video of myself playing the song. It doesn’t matter for recording purposes, but I always have my headphones on since the sound quality is superior and that’s how I’m used to playing during my practice sessions. I also don’t care about any background noise happening elsewhere in my home since I’m not recording the actual audio, only the MIDI from my piano.
To record the piano’s MIDI output, open up GarageBand on your computer and create a new project. Select “MIDI Software Instrument” for creating a new track. Under the new track’s sound library, select “Piano” and then further select “Steinway Grand Piano.” Click on the purple buttons above the timeline to deselect the metronome. When you’re ready to record, turn on your digital piano and click on the red button in GarageBand to start/end recording. This will record the MIDI output of your playing, which GarageBand will convert to audio using the “Steinway Grand Piano” virtual instrument.
To record a video of yourself playing the piano, mount your phone to the mic boom stand in the desired orientation and use your phone camera’s video recording capability to start/end recording. I use a Google Pixel 6 phone, and I typically prefer to record myself from an overhead perspective. After recording, I edit directly on my phone using its native Google Photos app: (1) remove sound, (2) rotate the video, if needed, so that it’s horizontal not vertical, (3) crop the video frame to a 16:9 ratio, remove unwanted elements, and make sure it’s centered on the keyboard, and (4) trim off the excess beginning and end parts of the timeline. Google Photos will automatically sync to the cloud, after which I download the edited video onto my computer.
To attach the MIDI audio to the phone video, return to GarageBand and click on the track that contains the recorded MIDI output from the piano. On the menubar at the top, go to “File” then “Movie” then “Open Movie…” and select the edited video file that was downloaded from Google Photos. Now the video file is attached to the MIDI track. On the timeline, drag the “Steinway Grand Piano” track via trial-and-error until the audio is synced to your satisfaction with the video file. It usually only takes me a couple of tries. Once you’re satisified, go to “File” then “Movie” then “Export Audio to Movie…” to export your final video file.
Conclusion
And that’s it! Now you have a file that contains a video of your performance synced with the sound from your piano’s MIDI output, which can be uploaded to platforms such as YouTube.
Here’s an example of one of my side-angle recordings:
And here’s an example of one of my overhead recordings: